


Game Information
Adelaide Oval
| fourth Quarter | |||
|---|---|---|---|
| Time | Team | Play | Score |
| 31:12 |  | D. Curtin Behind | 133 - 65 |
| 28:07 |  | F. O'Sullivan Goal | 132 - 65 |
| 25:53 | | J. Darling Goal | 132 - 59 |
| 20:08 | | H. Sheezel Behind | 132 - 53 |
| 18:43 | | T. Murray Goal | 132 - 52 |
| 17:05 | | Z. Duursma Behind | 126 - 52 |
| 13:56 | | D. Stephens Behind | 126 - 51 |
| 11:22 | | J. Rachele Goal | 126 - 50 |
| 8:46 | | P. Curtis Goal | 120 - 50 |
| 7:09 | | D. Fogarty Behind | 120 - 44 |
| 2:00 | | P. Curtis Goal | 119 - 44 |
| third Quarter | |||
| Time | Team | Play | Score |
| 26:07 | | C. Trembath Goal | 119 - 38 |
| 25:00 | | Rushed | 119 - 32 |
| 22:01 | | B. Keays Goal | 119 - 31 |
| 20:52 | | J. Soligo Behind | 113 - 31 |
| 17:10 | | L. Nankervis Goal | 112 - 31 |
| 14:41 | | B. Cook Behind | 106 - 31 |
| 11:05 | | C. Spargo Goal | 105 - 31 |
| 8:03 | | B. Keays Goal | 105 - 25 |
| 7:24 | | L. Pedlar Behind | 99 - 25 |
| 6:23 | | B. Keays Behind | 98 - 25 |
| 4:34 | | B. Cook Goal | 97 - 25 |
| 3:24 | | C. McKercher Behind | 91 - 25 |
| 0:57 | | T. Murray Behind | 91 - 24 |
| second Quarter | |||
| Time | Team | Play | Score |
| 33:16 | | J. Rachele Goal | 90 - 24 |
| 29:43 | | D. Fogarty Behind | 84 - 24 |
| 27:06 | | L. McAndrew Goal | 83 - 24 |
| 24:25 | | L. McAndrew Goal | 77 - 24 |
| 23:03 | | J. Darling Behind | 71 - 24 |
| 20:33 | | T. Murray Behind | 71 - 23 |
| 17:06 | | L. Nankervis Goal | 70 - 23 |
| 15:04 | | J. Rachele Goal | 64 - 23 |
| 13:35 | | D. Fogarty Goal | 58 - 23 |
| 11:47 | | J. Peatling Goal | 52 - 23 |
| 10:29 | | L. Pedlar Behind | 46 - 23 |
| 8:25 | | T. Murray Goal | 45 - 23 |
| 8:00 | | I. Rankine Behind | 39 - 23 |
| 3:16 | | J. Dawson Goal | 38 - 23 |
| 2:46 | | P. Curtis Behind | 32 - 23 |
| 1:32 | | J. Soligo Goal | 32 - 22 |
| first Quarter | |||
| Time | Team | Play | Score |
| 28:14 | | I. Rankine Behind | 26 - 22 |
| 21:56 | | I. Rankine Goal | 25 - 22 |
| 18:23 | | G. Wardlaw Goal | 19 - 22 |
| 16:37 | | J. Soligo Goal | 19 - 16 |
| 14:58 | | D. Fogarty Goal | 13 - 16 |
| 12:59 | | Z. Taylor Behind | 7 - 16 |
| 10:51 | | J. Peatling Goal | 6 - 16 |
| 8:22 | | Z. Duursma Behind | 0 - 16 |
| 6:45 | | J. Simpkin Behind | 0 - 15 |
| 6:03 | | D. Stephens Behind | 0 - 14 |
| 4:16 | | P. Curtis Goal | 0 - 13 |
| 3:30 | | D. Stephens Behind | 0 - 7 |
| 0:59 | | N. Larkey Goal | 0 - 6 |
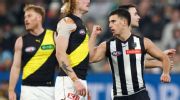
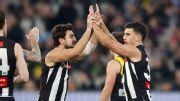
Collingwood have kicked the ton for only the second time this AFL season, beating Richmond by 34 points at the MCG.
A clever intercept from brother Josh helps set up Nick Daicos' third major vs. Richmond.
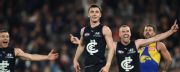
Josh Fraser says he's more focused on guiding Carlton through their growing pains rather than scratching his coaching itch after watching the Blues dismantle West Coast by 53 points at Marvel Stadium.
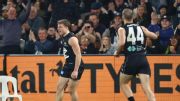
Talor Byrne kicks a brilliant goal during Carlton's 53-point win over West Coast.
Jack Dalton slots his maiden AFL goal after a standout defensive display.
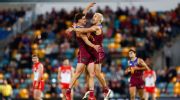
Sydney coach Dean Cox has warned his side they can't be one-trick ponies and must find another gear after their Brisbane humbling.
| POS | Team | Pts. | % | Form |
|---|---|---|---|---|
| 1 |
 FRE FRE
|
52 | 144.4 | WWWWW |
| 2 |
 SYD SYD
|
48 | 135.7 | LWWWL |
| 3 |
 HAW HAW
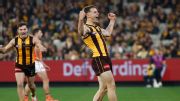
|
42 | 113.7 | WWLWW |
| 4 |
 GEEL GEEL
|
36 | 120.6 | WLLWL |
| 5 |
 ADEL ADEL
|
36 | 113.2 | WLWWW |
| 6 |
 BL BL
|
36 | 111.0 | LLWWW |
| 7 |
 MELB MELB
|
36 | 104.2 | LLWWL |
| 8 |
 WB WB
|
36 | 92.8 | WWWLW |
| 9 |
 COLL COLL
|
30 | 104.2 | WLLWW |
| 10 |
 SUNS SUNS
|
28 | 105.3 | WLLLL |
| 11 |
 CARL CARL
|
28 | 95.6 | WWWWW |
| 12 |
 NMFC NMFC
|
28 | 90.7 | LWLWW |
| 13 |
 STK STK
|
24 | 100.6 | LLLWL |
| 14 |
 GWS GWS
|
24 | 99.3 | WWLLL |
| 15 |
 PORT PORT
|
16 | 98.7 | LLWLL |
| 16 |
 WCE WCE
|
16 | 71.3 | LWLLL |
| 17 |
 RICH RICH
|
8 | 61.8 | WLLLL |
| 18 |
 ESS ESS
|
4 | 70.4 | LLLLL |